Bright Birthdays

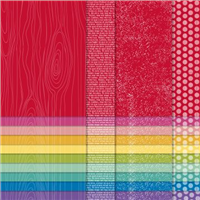
As part of the joining offer during Sale-a-Bration, you can earn a FREE set of Designer Series Paper (DSP). When I say set, I mean 5 PACKETS!!! of yet to be released paper from the upcoming Annual Catalogue in June. That’s right, you can get them ahead of everyone. Even demos can no longer get their hands on these, as the pre-order time period is over. So if you join my team before 28th February 2021, you can earn the paper that made this card.

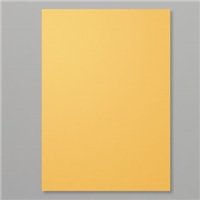
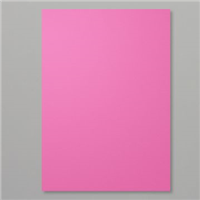
Of the five packs, I chose to go with the Brights collection. I usually fall into the trap of sticking to the Subtles or the Regals, so took a bit of a lane swerve. I love the colours that I chose, they go together so well; Pacific Point, Gorgeous Grape, Granny Apple Green and Daffodil Delight.

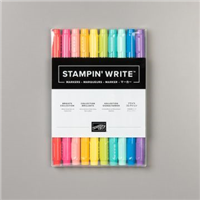
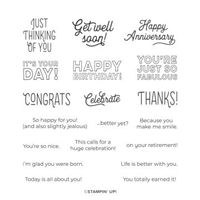
I wanted to match the stamping to the strips in the background, so used the same technique seen yesterday on my Simple Sunday series by using Stampin’ Write markers to colour sections of the sentiment. Which I think stamped rather well!

Have you seen the joining offer and been tempted? Ask me how before it’s too late!

Best Wishes,
Suzanne

Colours Used:

Supplies:

Fabulous Patterns

Layered cards are my new “go to” when I hit a crafty block, you don’t need much inspiration around you to make one. You just need some nice paper and a sentiment to bring a beautiful card front together. Or as I chose for this card, an excuse to use some paper that I hadn’t used in a while – Playing with Patterns.

I love Playing with Patterns, the paper designs and the rest of the suite are really fun, bright colours that suit a number of happy occasions. In the past, I’ve used it for birthdays and as a card to remind someone how fabulous they are – which is also the sentiment being used today.

After choosing three patterns that I felt would go together best, I layered up the card finishing it off with some resin dots, popping some of them where I felt they lined up with the pattern of the card. You could go one step further here and colour in the sentiment letters, but on this occasion I chose not to.

Are you a fan of layered cards?

Best Wishes,
Suzanne

Colours Used:

Supplies:

Fabulous Year Older

Excited doesn’t even come close – yesterday the new Stampin’ Up! Mini Catalogue for January to June 2021 launched – eek! So in true fashion, today’s project features new product. But this new product isn’t available to just anyone, oh no. The Designer Series Paper shown on the exterior of this box is part of an amazing gift to anyone who joins Stampin’ Up! during Sale-a-Bration. You can read more about this by clicking the button below!

The paper used is Crushed Curry from the Regals collection, but in my video I used Granny Apple Green which is from the Brights Family. Both of them are gorgeous colours to showcase this paper. I kept my box simple, as I want the DSP to really be shown off and take centre stage. With ab bit of white edging, I’m sure you would agree that the pattern of the paper really makes the box look fabulous!

Of course, to finish the box I have used one of my fave stamp sets from the new Mini Catalogue / Sale-a-Bration brochures called ‘Approaching Perfection’. The sentiments are just perfect and I find myself reaching for them again and again, as the jokey nature of the sentiments are my style all over.

Which colour do you prefer from the two showcased? If I made a third box – what colour would you like to see me use?

Best Wishes,
Suzanne

Colours Used:

Measurements:

  • Cardstock = 81/4 x 113/4 inches
  • Whisper White (1 piece) = 41/8 x 25/8 inches
  • Whisper White (2 pieces) = 41/8 x 13/4 inches
  • Whisper White (2 pieces) = 13/4 x 25/8 inches
  • Designer Series Paper (1 piece) = 37/8 x 23/8 inches
  • Designer Series Paper (2 pieces) =23/8 x 11/2 inches
  • Designer Series Paper (2 pieces) =37/8 x 11/2 inches

Scoring:

  • Long side = 2, 47/8, 67/8, 93/4 inches
  • Short side = 2, 61/4 inches (or 2 inches on both sides)

Supplies:

Come back for these after the 5th January and they will be live!
Please note, the paper can only be obtained by joining as a new member!

Oh So Sweet Ombre

It’s sneak peek time! First up I wanted to showcase one of the gorgeous papers available in the Sale-a-Bration brochure and one of several options when you place a qualifying order over £45 / 60 €. Technically, this project contains two items available in the brochure, but the main focus of today is on the gorgeous ‘Oh So Ombre’ Designer Series Paper.

The paper pack has 4 different colours in it; Bermuda Bay, Blackberry Bliss, Granny Apple Green and Rococo Rose (see video for a peek at these!) and has 2 designs in each colour – which are absolutely gorgeous. All four are amongst my faves from the Stampin’ Up! colour families.

My project today is inspired by a treat box that Pootles first made approximately 5 years ago using the envelope punch board. Unfortunately, the punch board is now retired and so I wanted to find a way in which I could still make a treat box that looked the same, but only used a score board.

After a bit of playing with different techniques and measurements, I hit the jackpot and found the perfect technique for making boxes like this – please watch the video and you will see how easy the scoring is!

And look at the finished result, sweet and simple – just how we like our projects!

Best Wishes,
Suzanne

Colours Used:

Measurements:

  • Designer Series Paper = 6 x 6 inches
  • Whisper White Scrap

Scoring:

  • One corner of the DSP at the 41/4 inch mark, with a second corner touching the left of the scoreboard (see video for more details).
  • Score at 2 and 3 inches.

Supplies:

Come back for these after the 5th January and they will be live!

Alternate Artistry Domed Box

OK, so I’m a little bit addicted to making these domed boxes. So much so, I’m here with a different version today. Following on from my TFI Friday Live Crafting last week, where I made one of these boxes with a single piece of Designer Series Paper (DSP), I’m back with a cardstock and DSP version.

This time I reached for the bright colours of the Artistry Blooms paper pack. My sample focused on Magenta Madness, whilst my video showcases Bumblebee – both colours from the 2020-2022 collection.

They’re a good size for treats, sweets, jewellery, wax melts, bath bombs, candles… the list is endless. BUT a tip – put the heavier goodies in the cardstock version so you benefit from the stronger base.

I absolutely love the ombre side of the papers included in the Artistry Blooms pack, and they have been used many times as they’re gorgeous. The picture above should show you just how gorgeous they are.

I finished off the box with co-ordinating ribbon and felt they didn’t need any decoration. I’ll keep this ready to use and decorate when I know the occasion they’re to be used for.

Which colour do you prefer?

Best Wishes,
Suzanne

Measurements:

  • Two pieces cardstock = 61/2 x 31/4 inches
  • Two pieces DSP = 61/2 x 2/34 inches

Scoring:

  • Cardstock
    • Long side = 23/4 inches
    • Short side = 1/4, 15/8 (partial score), 3 inches
  • Designer Series Paper
    • Long side = 23/4 inches
    • Short side = 13/8 inches (partial score)

Supplies: