Double Slot Treat Box

Birthday Party Live – Project #6

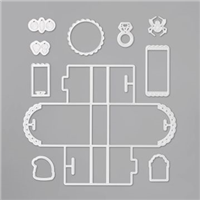
I love when Stampin’ Up! release dies that make cute little boxes such as the new Little Treat Box dies that are available. They are great when you are struggling to bring a box together for a project and mean you don’t have to work out the measurements before making it. This cute die is meant for a small treat, perhaps a small treat bar or some biscuits?

The treat box size is quite narrow, so does limit the treats that go inside it – however, I adapted mine to have two slots, so double the treats!! Who could say no to that?

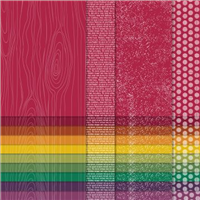
To make the project does require two sheets of 6 x 6 Designer Series Paper, but it’s well worth it in my opinion. I chose to make mine from the Regals paper stack, but this could be very easily adapted to suit any occasion. A Christmas Designer Series Paper stack would be perfect with a few stocking filler treats inside – perhaps some chocolate coins?

This project means that there is only one left of my Birthday Party Live Event, I’ll be sad to see it end…

** Don’t forget to take part in my Birthday Party Giveaway **

Good Luck!

Best Wishes,
Suzanne

Colours Used:

Measurements:

  • Designer Series Paper (2 Pieces) = 6 x 6 inches
  • Whisper White = Scrap piece

Supply List:

Snowflakes One Sheet Wonder

SnowflakeOSW_Pic

Gotta love a One Sheet Wonder, you get to make gorgeous cards with beautiful paper and only use a single sheet of it, meaning you have loads left for other projects! The paper in this One Sheet Wonder is from the Snowflake Splendor Designer Series Paper (DSP), it has gorgeous set of colours – nothing too traditional and looks almost inspired by the film, Frozen. Absolutely gorgeous.

To make this One Sheet Wonder, I cut my DSP into three 4 inch strips. Then I cut at every 31/2 inches down each strip resulting in 3 pieces of DSP ready for your card fronts. I backed mine onto a layer of Misty Moonlight and then onto a card base of Thick Whisper White cardstock.

Finally, I added a gorgeous sentiment using Balmy Blue Glimmer paper and finished them off with the Blue Adhesive-Backed Gems. I’m really pleased with the results and have found a very quick way to make customer thank you card for any future shoppers.

Best Wishes,
Suzanne

Colours Used:

Supply List:

Polar Hue

PolarHue_Pic

How cute is this gorgeous Polar Bear? Another animal that I get to colour in with my blends – which makes me happy! He looks so happy skating along there.. To make this card, I chose the Designer Series Paper (DSP) to go with the stamp set & my colours went from there. The DSP contains Highland Heather and Pool Party, so this is the colours I used on my Polar Bear to tie the theme together.

Mounting the DSP onto a piece of Highland Heather, I then used the Stitched So Sweetly dies to create a lovely border for my Polar Bear to make him the central focus on the front, finished off with a beautiful ‘For You’ sentiment.

It’s a very simple card, but a lovely one that could quickly be reproduced – I hope you like it!

Best Wishes,
Suzanne

Colours Used:

Colors

Penguin Fun

PenguinFun_Pic

I love cute stamp sets, especially ones that I can colour in with my blends alongside my children. When the Autumn / Winter Mini Catalogue went live for demonstrators, my children flicked through the pages and immediately chose the ‘Freezin’ Fun’ stamp set used on this card as well as the ‘Have a Hoot’ and ‘Warm & Toasty’ stamp sets. They all have gorgeous outline images of animals which we can colour to our hearts content.

This card uses a great technique for creating your own backgrounds without the need for Designer Series Paper (DSP). Now don’t get me wrong, I love DSP – but sometimes you want to use something else or the papers don’t quite suit what you’re wanting to achieve.

The background was achieved by choosing 4 different inks – on this occasion it was differing shades of blue to create a snow flurry sky effect. The snowflake stamp I used comes from the ‘Snowflake Wishes’ bundle, using versamark to stamp them randomly before embossing them with white powder.

The ‘Freezin Fun’ stamp set forms part of the ‘Freezin’ Fun’ Bundle, which I absolutely adore as it means I can die cut each of the images to use on my projects. This card allowed me to showcase them perfectly against the blended ink background. The die set includes the stitched edge which forms the snowy hill on the background.

I absolutely love it and have made differing version already, one of which is shown in my video below. Hope you enjoy!

Best Wishes,
Suzanne

Colours Used:

Colors

Measurements:

  • Card Base = 41/8 x 111/2 inches, score at 57/8 on the long side
  • Background Layer = 37/8 x 55/8 inches
  • Stitched Snow Layer = 37/8 x 2 inches
  • Scraps of Whisper White for stamping.


Glimmer Snowflakes

GlimmerSnowflakes_Pic

How pretty is this card? I can’t take the credit at all, I only glued the bits down – but the star of the show has to be the Balmy Blue Glimmer paper, its so glittery and a lovely colour. I had to make it the star of the show, so didn’t want to do too much to distract away from the glimmer.

The dies and stamp set form part of the new Snowflake Splendour suite, which has just launched in the new Autumn / Winter Mini Catalogue.  With the addition of a Stitched Rectangle Die, this card was made with a focus on the glimmer paper. The dies are stuck onto the glimmer using the adhesive sheets, I prefer to use them for intricate dies as multi purpose or fine tip glue always find a way to sneak out from under the item and show up on the card front. This way, the adhesive stays hidden – where it should be!

To finish off the card, I used matching Balmy Blue ink and the Blue Adhesive Backed Gems, bringing a little bit of bling to the card. I absolutely love it and I’m so happy the photograph was able to show the glitter on the background.

Are you going to invest in the suite?

Best Wishes,
Suzanne

Colours used:

Colors