Matchbox Birthday

Welcome to my Butterfly Bouquet spotlight week – this week will feature 7 video tutorials posted back to back to spotlight this early release collection from the 2021-2022 Annual Catalogue. The collection is made up of several components – Stamps, Dies, Designer Series Paper (DSP) and Specialty Paper.

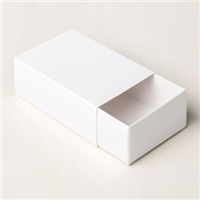
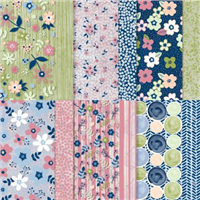
Eek! I’m so excited to show you this project – it’s so so easy to make and is so cute! Today’s project features the Designer Series Paper (DSP) from the Butterfly Bouquet collection – this paper is an exclusive which will only be available during this promotion and it is absolutely gorgeous! I’ve teamed the paper up with the Treat Boxes from the Love you Always suite in the Jan to June Mini Catalogue. These are a really good size and so can be filled with plenty of treats to gift to someone as a thank you, a congratulations or even part of a birthday gift!

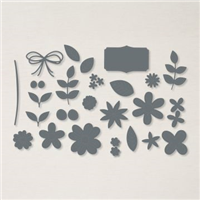
Using one of the leftover butterflies that I cut out for yesterday’s project, I wrapped the outer layer of the treat box with a piece of Designer Series Paper cut to fit. The paper instantly gives the box a lift and makes it feel special even without the extra decoration.

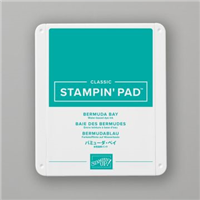
The second largest butterfly then makes its appearance on the front with a quick sentiment in Bermuda Bay to match the paper. I love how it looks when finished and I still have plenty of butterflies left for more projects!

Have you been tempted by the Butterfly Bouquet collection yet? If you have and want to get your hands on it, click the links at the bottom of this page.

Best Wishes,
Suzanne

Measurements:

  • Designer Series Paper = 53/4 x 4 inches
  • Basic White Scrap

Supply List:

Flowering Perfection

This Designer Series Paper (DSP) didn’t look as brilliant in the catalogue as it does in real life – the lesson here is to buy it if the thumbnails even slightly intrigue you. Not once has any of the products I have bought this way failed me. I’m sure you’ll agree by watching my video below, this paper is absolutely gorgeous!

I love the contrast of the bright colours against the black background, and I also love that the papers (and the stamp set) are one of the many options you can earn for FREE until the 28th February. The selection this year is one of the the best I have seen in my time as a demo! I’m not sure what the project I made is considered a box or a bag, but I love it nonetheless. They can store flat too, so for those who may mass produce them for sending treats or products, they can make them in advance and store them with minimal space required.

And don’t get me started about how good this stamp set is – I find myself reaching for it all the time. Just like the paper it is one of the choices available for FREE during Sale-a-Bration.

Have you chosen either of these as part of your freebies?

Best Wishes,
Suzanne

Colours Used:

Measurements:

  • Basic Black = 81/4 x 113/4 inches
  • Designer Series Paper (2 pieces) = 4 x 4 inches
  • Basic White Scrap

Scoring:

  • Long Side (113/4) = 3/4, 47/8 inches on both sides
  • Short Side = 2 inches on both sides

Supplies:

Origami Blooms

You know when you sit down at your craft table with a project in mind, but then something just doesn’t go quite right so you end up with something completely different? Well that’s what happened here, a misjudged measurement meant the project took a very different turn and ended in something else, equally beautiful.

The project gave me the opportunity to use the pierced blooms dies again, which now I have them, I cannot stop using. They’re the perfect addition to any project and coincidentally co-ordinate with the FREE Paper Blooms Designer Series Paper (DSP) that I chose.

Also I’ll let you into a little secret, I personally prefer the version I made in the video, especially because I manage to tie a gorgeous bow on camera!

Have you ever had a project that went wrong, but then you preferred the end result?

Best Wishes,
Suzanne

Colours Used:

Measurements:

  • Designer Series Paper = 12 x 12 inches
  • Scraps of Petal Pink, Soft Sea Foam, Basic White, Night of Navy, Seaside Spray, Rococo Rose, Old Olive.

Scoring:

  • Side 1 = 3 and 6 inches
  • Side 2 = 41/2 and 71/2 inches

Supplies:

Prism Congrats

How amazing is the new Hydrangea Hill Mercury Acetate? I couldn’t wait to get my hands on a pack of it – not only because it contains purple either! The pack contains two different colours, Highland Heather & Rococo Rose, both equally beautiful. My box is made from Highland Heather and during my Facebook Live, I made one using Designer Series Paper (DSP) from the Snail Mail suite.

The box is a prism slider, where the acetate or DSP acts as a ‘wrap’ around the inner card box. It’s a good size and will hold a varying amount of sweet treats or jewellery – perhaps even stationary. Because of the acetate and how stunning it looks, I didn’t need to add much more to get a gorgeous finish to the project.

A quick bow using the Gorgeous Grape sheer ribbon, a couple of flowers from the Hydrangea dies and a sentiment from the ‘You are Amazing’ stamp set. Quick and easy project which showcases the suite perfectly.

Which way did you prefer – acetate or Designer Series Paper?

Best Wishes,
Suzanne

Colours Used:

Measurements:

  • Designer Series Paper = 63/4 x 8 inches
  • Cardstock = 71/2 x 113/4 inches
  • Scraps for stamping.

Scoring:

  • 21/2 inches on all four sides

Supplies:

Ombre Day

Now I’ve made no secret of the fact that this paper has to be my absolute favourite from all of the Sale-a-Bration events that I have been a demonstrator for – I just love it! The colours, the paper patterns, everything. Especially as one of the four colours is Blackberry Bliss!

My project was going to be a lidded box that was reinforced with a card base, but I couldn’t decide between the two designs, so opted for both (one for the lid, one for the base). The best part about using Designer Series Paper (DSP) for a project like this is the design on the inside of the box as well as the outside – winner!

I was able to use the Blackberry Bliss Striped Ribbon on this box, which is also one of my favourite ribbons (anything Blackberry Bliss is my favourite!). The bows you can tie with this ribbon are so beautiful, I love them!

Which of the four colours do you prefer; Rococo Rose, Blackberry Bliss, Granny Apple Green or Bermuda Bay? Let me know in the comments.

Best Wishes,
Suzanne

Colours Used:

Measurements:

  • DSP Piece 1 (Lid) = 6 x 6 inches
  • DSP Piece 2 (Base) = 6 x 6 inches

Scoring:

  • Box Base = 11/2 inches on all four sides
  • Box Lid = 3/4 and 11/2 inches on all four side (watch my video for a tip!)

Supplies: