Oh So Sweet Ombre

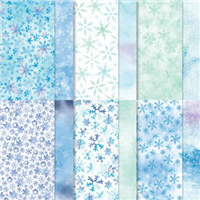
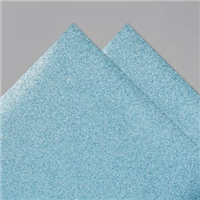
It’s sneak peek time! First up I wanted to showcase one of the gorgeous papers available in the Sale-a-Bration brochure and one of several options when you place a qualifying order over £45 / 60 €. Technically, this project contains two items available in the brochure, but the main focus of today is on the gorgeous ‘Oh So Ombre’ Designer Series Paper.

The paper pack has 4 different colours in it; Bermuda Bay, Blackberry Bliss, Granny Apple Green and Rococo Rose (see video for a peek at these!) and has 2 designs in each colour – which are absolutely gorgeous. All four are amongst my faves from the Stampin’ Up! colour families.

My project today is inspired by a treat box that Pootles first made approximately 5 years ago using the envelope punch board. Unfortunately, the punch board is now retired and so I wanted to find a way in which I could still make a treat box that looked the same, but only used a score board.

After a bit of playing with different techniques and measurements, I hit the jackpot and found the perfect technique for making boxes like this – please watch the video and you will see how easy the scoring is!

And look at the finished result, sweet and simple – just how we like our projects!

Best Wishes,
Suzanne

Colours Used:

Measurements:

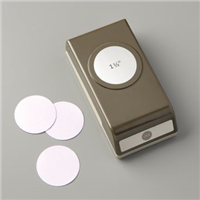
  • Designer Series Paper = 6 x 6 inches
  • Whisper White Scrap

Scoring:

  • One corner of the DSP at the 41/4 inch mark, with a second corner touching the left of the scoreboard (see video for more details).
  • Score at 2 and 3 inches.

Supplies:

Come back for these after the 5th January and they will be live!

Simple Sunday #5 – Moving Along

Welcome to my new Sunday series, affectionately known as Simple Sunday! The aim of this series is to showcase projects using minimal supplies, ideal for the beginner crafter or someone new to Stampin’ Up! Each project is a white card base with a 3×3 panel decorated using a single stamp set or die set. This weeks project is showcasing the Way to Go! stamp set, which is so versatile for many different themes – children, welcoming new babies, car / train hobbyists or for those setting off on their travels.

As you know, I love getting my blends out to colour in. However, this stamp set also features two step stamping. Meaning you don’t need to use blends like I have, meaning the one less item from the list of items used. And in true style, I have shown a second colour way in my video below.

I love the dimension of the fussy cut train against the stamped background, highlighting the sentiment and tying the whole project together. For the baby boy version, I used Balmy Blue where I featured Petal Pink for a baby girl inspired card. But you may not wish to follow the traditions and go with something a little brighter.

And best of all? You don’t even have to use a train, the stamp set also features a car and a helicopter! Perfect! But I think I prefer the train – reminds me of Thomas the Tank Engine that I used to watch as a child. Which do you prefer?

Best Wishes,
Suzanne

Colours used:

Measurements:

  • Card Base = 41/8 x 113/4 inches, scored at 57/8
  • Front Panel = 3 x 3 inches
  • Scrap of Whisper White for stamping

Supplies:

Alternate Artistry Domed Box

OK, so I’m a little bit addicted to making these domed boxes. So much so, I’m here with a different version today. Following on from my TFI Friday Live Crafting last week, where I made one of these boxes with a single piece of Designer Series Paper (DSP), I’m back with a cardstock and DSP version.

This time I reached for the bright colours of the Artistry Blooms paper pack. My sample focused on Magenta Madness, whilst my video showcases Bumblebee – both colours from the 2020-2022 collection.

They’re a good size for treats, sweets, jewellery, wax melts, bath bombs, candles… the list is endless. BUT a tip – put the heavier goodies in the cardstock version so you benefit from the stronger base.

I absolutely love the ombre side of the papers included in the Artistry Blooms pack, and they have been used many times as they’re gorgeous. The picture above should show you just how gorgeous they are.

I finished off the box with co-ordinating ribbon and felt they didn’t need any decoration. I’ll keep this ready to use and decorate when I know the occasion they’re to be used for.

Which colour do you prefer?

Best Wishes,
Suzanne

Measurements:

  • Two pieces cardstock = 61/2 x 31/4 inches
  • Two pieces DSP = 61/2 x 2/34 inches

Scoring:

  • Cardstock
    • Long side = 23/4 inches
    • Short side = 1/4, 15/8 (partial score), 3 inches
  • Designer Series Paper
    • Long side = 23/4 inches
    • Short side = 13/8 inches (partial score)

Supplies:

Simple Sunday: Gnome for the Holidays

Welcome to my new Sunday series, affectionately known as Simple Sunday! The aim of this series is to showcase projects using minimal supplies, ideal for the beginner crafter or someone new to Stampin’ Up! Each project is a white card base with a 3×3 panel decorated using a single stamp set or die set. This weeks project is showcasing the Gnome for the Holidays stamp set, which I think is so adorable!

I love colouring in images with my blends and this stamp set really offers some great opportunities to do that. I coloured in the cute little tree house and the gnome using various colours – my video details which ones. The great thing about Stampin’ Up! stamp sets is the stamped image gives you indications of where the light and shade should be, making blending even easier!

Once completed, I fussy cut around the gnome and used dimensionals to pop him onto the front of the card topper. Finishing the whole card with a small bow of braided linen trim. How cute?

Best Wishes,
Suzanne

Colours:

Measurements:

  • Card Base = 41/8 x 113/4 inches, scored at 57/8
  • Front Panel = 3 x 3 inches
  • Scrap of Whisper White for stamping

Supplies:

Snowflake Domed Splendor

Hands up, how likes an abnormal shaped box? Or something that is a little different to the norm? Well, today’s project is certainly along those lines. Now I’m not the first person to make a box like this, and I’ve seen far too many to credit a single person. So I thought I’d try my own version – these are quite a large size, and will fit a good quantity of treats.

I haven’t used the Snowflake Splendor Designer Series Paper (DSP) in a while and it is such beautiful paper, that I reached out for it again. The colours are absolutely gorgeous and so is the matching ribbon. The picture below shows the iridescent sheen to the ribbon, which makes it sparkle against any project.

I finish my project off with a tag made from Balmy Blue glimmer paper and a Whisper White stitched circle. The stamp is from the cute Snowman Season stamp set and finished the label well.

Which pattern do you prefer – the watercolour ombre one or the snowflakes?

Best Wishes,
Suzanne

Colours Used:

Measurements:

  • Designer Series Paper = 111/2 x 61/2 inches
  • Whisper White Scrap
  • Balmy Blue Glimmer Scrap

Scoring:

  • Long Side Full Scores = 23/4, 51/2, 81/4, 11 inches
  • Short Side Full Scores = 23/4 inches
  • Long Side Partial Scores = 13/8, 41/8, 67/8, 95/8 inches

Supplies: