Happy Piggin’ Birthday!

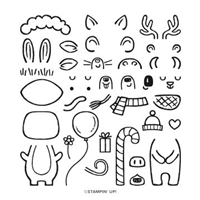
Aww, how cute is this little guy? And that hat is just adorable! The inspiration for this little guy came from my daughter who is a huge fan of pigs. As soon as she spotted this bundle in the catalogue, she begged me to order it. With the numerous combinations you can stamp and die cut with the bundle, I just couldn’t say no.

The number of animals / combinations you can make with the bundle are amazing, so many different animals to create, which we loved trying to work out when we first got the set. I’ve been stuck in a Halloween / Christmas phase lately so tried to make this card for a different occasion – this one being for a birthday. The balloons, present and flower all come in the same set so it’s great to set the theme of the card as well as create lots of different animals.

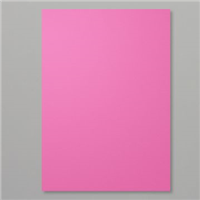
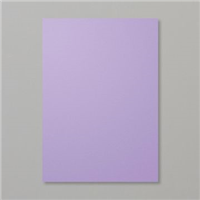
My daughter went for Magenta Madness and Highland Heather as part of her card, which I think looks great together! What do you think?

What colours would you put together and with which animal?

Best Wishes,
Suzanne

Colours Used:

Supply List:

Joy to the World

Eek! It’s October – how did that happen? The nights are already drawing in and the clocks will change soon also. Most would see that as a negative, but I absolutely love it. I love the run up to the events during this time of year – Halloween, Bonfire Night, Christmas etc. So I thought it was time I cracked out the foil and make some full blown Christmas projects.

Today’s is a slimline pocket pouch, a great size for small bags of sweeties or perhaps small chocs such as Green & Blacks. Ideal for table favours, part of a hamper treat selection or in the stocking on Christmas Eve.

The word ‘joy’ on the front is made from the dies of the same name using two different foils. The dies come with three separate segments to make up the wording, however I chose to only use two for this project.

And of course, I had to break out the Wonder of a Season ribbon combo and do the double ribbon bow tie that I previewed when I first got my initial order from the Autumn / Winter catalogue.

What do you think would fit nicely into this pouch?

Best Wishes,
Suzanne

Colours Used:

Measurements:

  • Cardstock = 8 x 4 inches
  • Green Foil Scrap
  • Gold Foil Scraps
  • Whisper White Scrap

Scoring:

  • Long side (8″) = 33/4 x 41/4 inches
  • Short side (4″) = 1/2 inch on both sides

Supply List:

Christmas Carton

I’ve hit that time of year when my mind has turned to Christmas and table favours, little gifts for team mates or for my children’s school friends. ‘Tis the Season Designer Series Paper (DSP) is amazing for this as it has so many different patterns in a mixture of seasonal colours.

These gorgeous little milk carton style boxes are big enough for some sweet treats and can make sweet table favours for Christmas Day itself. I’ve made mine look even cuter by adding some foil accents around the paper, which really makes it pop.

This one features Real Red heavily, and the ribbon is truly gorgeous! What would you use these little cartons for?

Best Wishes,
Suzanne

Colours Used:

Measurements:

  • Card Stock = 5 x 7 inches
  • Red Foil = 13/8 x 15/8 inches (4 pieces)
  • Designer Series Paper = 11/4 x 11/2 inches (4 pieces)
  • Red Foil = 13/8 x 1 inches (2 pieces)
  • Designer Series Paper = 11/4 x 7/8 inches (2 pieces)

Scoring:

  • Long side (7″) = 15/8, 31/4, 47/8, 61/2 inches
  • Short side (5″) = 15/8, 31/2, 45/8 inches

Supply List:

Rainbow Stars

RainbowStars_Pic

The Rainbow Glimmer paper is gorgeous, so gorgeous I didn’t know how to use it initially as I didn’t want to cut into it. Technically, I didn’t cut into this as whilst it isn’t a full piece of 12 x 12, it is a full piece underneath the top layer of Whisper White. I wanted to show the rainbow glimmer off in a way that was subtle but pretty at the same time.

Using the Happy dies, I die cut a number of randomly placed stars across the top layer of white. Whilst randomly placing them, I was also making sure I was capturing the full ombre of the Rainbow Glimmer to really show it off – but leaving space for a sentiment to be added.

I kept it quite simple by layering the white onto more white and stamping my sentiment in Magenta Madness for a pop of colour alongside the rainbow. Which I absolutely love! Do you love the Rainbow Glimmer too?

Best wishes,
Suzanne

Colours Used:

Supply List:

Gleaming Cube

Making large boxes isn’t done often, mainly because I like to save Designer Series Paper (DSP) and not use an entire sheet in one go. But that’s silly – that’s what it’s for and should be used for others to be amazed by. So I’ve done it, this project uses a full 12″ x 12″ sheet of Specialty Designer Series Paper and a full 12″ x 12″ foil sheet. It looks absolutely gorgeous and I wish I had done it a lot sooner.

The Brightly Gleaming paper is a returning fave from last year’s Autumn / Winter Mini Catalogue and you can see why – it’s absolutely beautiful. There isn’t much you need to do to a project when you have paper like this! So I decided to make the most of the stunning paper and not do too much to cover it up.

The foil base sits with the paper lid and a wrap of Night of Navy ribbon – the only extra piece is a small label, ready for the recipients name to be added. I love it, almost too much – who is going to receive this from me? It’s a great size to fit lots of treats, jewellery, scarves, ornaments, a bundle of smellies… all sorts!

Have you got your hands on this paper? If not, why not?

Best Wishes,
Suzanne

Colours Used:

Measurements:

  • Designer Series Paper = 12 x 12 inches
  • Copper Foil = 12 x 12 inches
  • Copper Foil scrap.
  • Very Vanilla scrap.
  • Night of Navy scrap.

Scoring:

  • Designer Series Paper = 4 inches on all four sides (see video for tip)
  • Copper Foil = 4 inches on all four sides

Supply List: