Rainbow Stars

RainbowStars_Pic

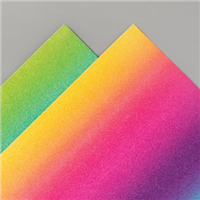
The Rainbow Glimmer paper is gorgeous, so gorgeous I didn’t know how to use it initially as I didn’t want to cut into it. Technically, I didn’t cut into this as whilst it isn’t a full piece of 12 x 12, it is a full piece underneath the top layer of Whisper White. I wanted to show the rainbow glimmer off in a way that was subtle but pretty at the same time.

Using the Happy dies, I die cut a number of randomly placed stars across the top layer of white. Whilst randomly placing them, I was also making sure I was capturing the full ombre of the Rainbow Glimmer to really show it off – but leaving space for a sentiment to be added.

I kept it quite simple by layering the white onto more white and stamping my sentiment in Magenta Madness for a pop of colour alongside the rainbow. Which I absolutely love! Do you love the Rainbow Glimmer too?

Best wishes,
Suzanne

Colours Used:

Supply List:

Open If you Dare

OpenIfYouDare_Pic

I love Halloween and I always love the Halloween suites that Stampin’ Up! releases each year – without fail. This years is even better than last years; the Designer Series Paper (DSP), the embellishments, the glimmer… I love it all!  I also love how it gets me using colours that I don’t often reach for – such as Cajun Craze.

This little box is the right size to house a candle jar from Air Wick, I prefer using these inside pumpkins on Halloween as they contain the flame, are easy to set in and out of the pumpkin and can be used around the home afterwards too.

Inspired by the candle itself, my first version was made using Blackberry Bliss, it co-ordinated well with the DSP pattern I chose and also meant I could switch out the colour and keep all the other elements the same.

I cannot get enough of the embellishments on this box – the Iridescent Pearls, the Black Glimmer paper and the Glittered Organdy Ribbon. They look so good together and make a perfect finish for my box.

Which colour do you prefer?

Best Wishes,
Suzanne

Colours Used:

Colors

Measurements:

  • Cardstock = 63/4 x 91/2 inches
  • Designer Series Paper = 5 pieces of 2 x 2 inches
  • Sentiment Layer 1 = 11/2 x 11/4 inches
  • Sentiment Layer 2 = 11/2 x 1 inches
  • Scrap of Black Glimmer

Scoring:

  • Long Side (91/2): 21/4, 41/2, 63/4, 9 inches
  • Short Side (63/4): 21/4, 41/2 inches

Glimmer Snowflakes

GlimmerSnowflakes_Pic

How pretty is this card? I can’t take the credit at all, I only glued the bits down – but the star of the show has to be the Balmy Blue Glimmer paper, its so glittery and a lovely colour. I had to make it the star of the show, so didn’t want to do too much to distract away from the glimmer.

The dies and stamp set form part of the new Snowflake Splendour suite, which has just launched in the new Autumn / Winter Mini Catalogue.  With the addition of a Stitched Rectangle Die, this card was made with a focus on the glimmer paper. The dies are stuck onto the glimmer using the adhesive sheets, I prefer to use them for intricate dies as multi purpose or fine tip glue always find a way to sneak out from under the item and show up on the card front. This way, the adhesive stays hidden – where it should be!

To finish off the card, I used matching Balmy Blue ink and the Blue Adhesive Backed Gems, bringing a little bit of bling to the card. I absolutely love it and I’m so happy the photograph was able to show the glitter on the background.

Are you going to invest in the suite?

Best Wishes,
Suzanne

Colours used:

Colors


Rainbow Birthdays

20200611_202157233_iOS

That’s right, I’m back!

What better time to come back to the world of blogging and sharing than the new Stampin’ Up 2020-2021 catalogue? I have remained a demo during the time I’ve been away from my blog, so have plenty of goodies to show you – I can’t wait!

There is a product in every catalogue that turns up and looks so much better than the photos can give justice. The rainbow glimmer paper is that item in this year’s catalogue, it is absolutely gorgeous!

This card was made for a member of my team in my day job, who turned 21 last week. With such a milestone birthday, I felt it was only right to make a card with such amazing product. Because I didn’t want to distract too much away from the gorgeous rainbow gradient, I went for a simple silhouette look using dies from the Happy and Well Written sets.

I think you’d agree the paper makes the card really special!

Best Wishes,

Twinkling Congratulations

20181011_093131955_iOS

Ahhh, how peaceful and serene is this card? A change away from the Festive theme that I’ve had going on the past few weeks and can suit any occasion – with the gorgeous starry sky and the subtles colours to accompany it.

To add layers to this card, I used a circle of vellum – which also adds a backdrop to the sentiment and provides the perfect area for some glimmer stars. Completed with a quick ‘congratulations’ sentiment, which can be changed out to suit.

I absolutely love this card and the Designer Series Paper (DSP) used, I really didn’t want to cut into it, but it makes such a lovely background and serves this card justice.

How are you finding the Twinkle Twinkle suite? Let me see what you’ve made..

Best Wishes,
Suzanne

Supply List: